
I have not made any youtube video for a while, so I made one for a change.
It is about this Hi-Tech Toilet seat that I bought recently.
Very Silly video. Hope you guys like it.
Dec 21, 2008
Sep 7, 2008
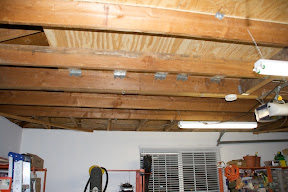
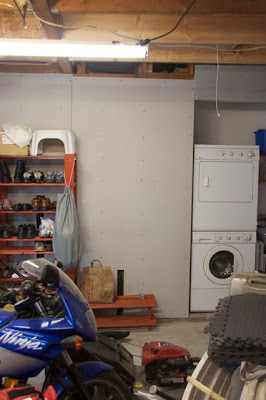
Rewiring power cords on the garage ceiling
I spent half of my day rewiring power cords on my garage ceiling.
There where so much power cords on my garage ceiling, I guess the previous owner of the house these cables are making the garage look uglier than needs to be. So I rewired them all through my attic, so my ceiling look little more organized and cleaner.
This was how it look before rewiring.
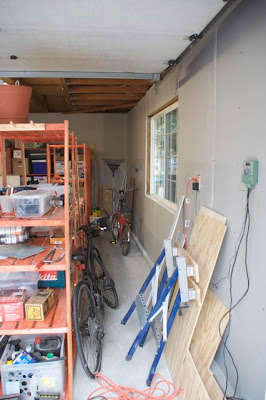
This is how it looks now:
Much better, isn't it? I am planning to hang my boat on the ceiling soon.
There where so much power cords on my garage ceiling, I guess the previous owner of the house these cables are making the garage look uglier than needs to be. So I rewired them all through my attic, so my ceiling look little more organized and cleaner.
This was how it look before rewiring.
 |
| From Dry wall |
 |
| From Dry wall |
This is how it looks now:
 |
| From Dry wall |
 |
| From Dry wall |
Much better, isn't it? I am planning to hang my boat on the ceiling soon.
Sep 6, 2008
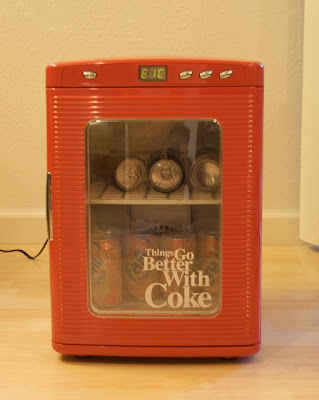
Coca cola Refrigerator
I've been looking for a small refrigerator to be added to my garage.
I wanted the one with glass window in the front door, so you can see inside, and it's got to be either cute or cool or both.
I finally found one.
When you look from the side, you can see a coke bottle drawn in white.
This is more on cute side than cool, but I like it.
There is a handle on the top.
It comes with car adater as well, so you can take it on your trip. I have a feeling that I will be taking this around more often than not,.
You can get this from amazon.com.
I wanted the one with glass window in the front door, so you can see inside, and it's got to be either cute or cool or both.
I finally found one.
 |
| From Gadgets |
When you look from the side, you can see a coke bottle drawn in white.
This is more on cute side than cool, but I like it.
 |
| From Gadgets |
There is a handle on the top.
 |
| From Gadgets |
It comes with car adater as well, so you can take it on your trip. I have a feeling that I will be taking this around more often than not,.
You can get this from amazon.com.
Sep 2, 2008
Broken Window Theory
Have you heard of "Broken Window Theory"?
According to the theory, when a broken window is left un-repaired, it sends the message that nobody cares about the broken widnow. Pretty soon more windows will be broken, there will be graffiti all over the place and neighborhood will quickly turn itself to a ghetto.
I guess this theory can be applied in may different ways, such as one student looking at porn during class.
Sep 1, 2008
Camouflage paint on Nerf Dart Tag Blaster
I've done Camouflage paint on Nerf Dart Tag Blaster.
This gun is super easy to disassemble. Painting is easy as well. If you want to get familiar with how Nerf revolver gun such as Maverick works, this is a good gun to practice with.
If you want to combat with your friends using Nerf guns, this is also the most practical gun. Here is what I've done with it.
Aug 27, 2008
Kitchen Renovation Project: installing Range Hood
We started installing the range hood on Sunday morning. If we don't get done today, we will be in trouble.
We worked in the attic first. First, we cut out the space where range hood was going to fit. Then We cut out the beam that was going to be on our way, then installed two new beams that would also support the range hood. But there was no head space at where we had to work at, so we had to be on our stomach the whole time to get this done.

There were bunch of glass wools exposed everywhere. So I placed some pieces of plywood to cover them up and got on the plywood and started working, but using the hand saw whole being on your stomach was not fun at all.
As soon as I was done with cutting, then I started installing the 2 x 6s which will support the range hood. The place was so narrow with existing chimney there. We could not even use drill driver to get the screws in. So I had to tighten all the screws with my hand tool only, while lying on my stomach still. I was so sick of being in this position.

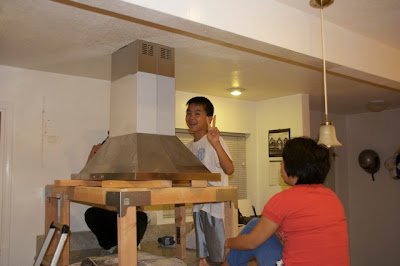
Finally finished this miserable work. The 2 pieces of wood yon can see are the new beams.
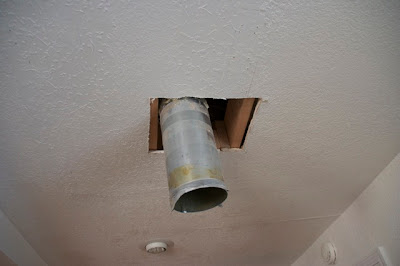
Then we had to cut out part of the chimney and joint with the flexible one to it would go into the new range hood properly. Then we placed support frame. Again, there was not enough space in the support frame to use power tools, so we had to screw in 4 big screws to mount the support frame to the beams we just installed. It was really, really hard.
By then, we started driving kids to help us out. Somebody had to hold the support frame still while at least 2 screws are placed to mount the support frame. It was heavier than it looks. This process felt like endless process.
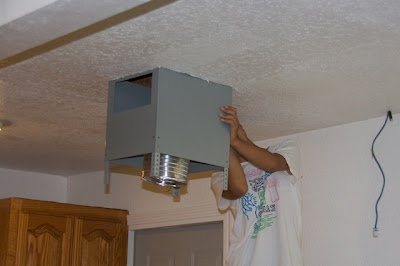
Then we added lower support frame.

We stared to work on installing the chimney cover, and started wiring range hood. The boys still had energy left, but my wife and I were totally exhausted,
We had more screws to go, but it was well past 7:00pm. so we went out to get something to eat, We resumed the work around 8:00pm.
At 9:30pm:
We are DONE!!!

I was so worked up that I just could not fall asleep.
Glad it's over now.

I like working DIY stuff since was a low teen,But this was the most challenging work ever.
We worked in the attic first. First, we cut out the space where range hood was going to fit. Then We cut out the beam that was going to be on our way, then installed two new beams that would also support the range hood. But there was no head space at where we had to work at, so we had to be on our stomach the whole time to get this done.
There were bunch of glass wools exposed everywhere. So I placed some pieces of plywood to cover them up and got on the plywood and started working, but using the hand saw whole being on your stomach was not fun at all.
As soon as I was done with cutting, then I started installing the 2 x 6s which will support the range hood. The place was so narrow with existing chimney there. We could not even use drill driver to get the screws in. So I had to tighten all the screws with my hand tool only, while lying on my stomach still. I was so sick of being in this position.
Finally finished this miserable work. The 2 pieces of wood yon can see are the new beams.
Then we had to cut out part of the chimney and joint with the flexible one to it would go into the new range hood properly. Then we placed support frame. Again, there was not enough space in the support frame to use power tools, so we had to screw in 4 big screws to mount the support frame to the beams we just installed. It was really, really hard.
By then, we started driving kids to help us out. Somebody had to hold the support frame still while at least 2 screws are placed to mount the support frame. It was heavier than it looks. This process felt like endless process.
Then we added lower support frame.
We stared to work on installing the chimney cover, and started wiring range hood. The boys still had energy left, but my wife and I were totally exhausted,
We had more screws to go, but it was well past 7:00pm. so we went out to get something to eat, We resumed the work around 8:00pm.
At 9:30pm:
We are DONE!!!
I was so worked up that I just could not fall asleep.
Glad it's over now.
I like working DIY stuff since was a low teen,But this was the most challenging work ever.
But, hey, it looks really cool. I am glad we did it.
Aug 26, 2008
You can slice a bread with MacBook Air
I had no idea.... you can actually slice a piece of bread with MacBook Air.
I must say this guy is either creative or crazy, or both.
http://forums.macrumors.com/showthread.php?t=549457&page=5#post6100113

I don't know if I want to spend $1800 for a bread knife that's really difficult to use.
I think Apple should add stuff like can opener, screw drivers, measure, nail clipper, etc etc to turn MacBook Air into multi-Tool computer.
Aug 25, 2008
Kitchen Renovation Project: Removing Cabinet
So now that I got the island range hood, I decided to get started on this. Well... the problem was that once I got started on this, there was no turning back. I even would not be able to use the kitchen again unless I finish the installation of the new range hood.
On top of it, I only had this Saturday and Sunday to work on this. I'd better finished this in 2 days or else I was going to be really screwed.
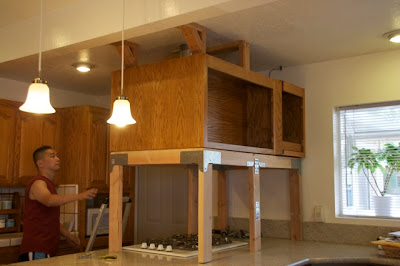
If you compare this existing cabinet to my size, you can see how big it was. I thought it out before I got started, and I created a stand with 2 x 4 studs to be place right under neath of the cabinet, This way, even if anything happens, I know I am going to be safe and would protect the burners.
I started off with removing all the cabinet doors.
I removed the range hood, all the doors, ethernet cable and TV cable that were coming to this cabinet.
Then I removed the chimney and lastly, I started removing the screws that were attaching this cabinet to the wall and the ceiling.

But....
This cabinet did not come off!!
Eventually, I discovered that on top of all the screws, there are structaul support between the cabinet and the wall, which really attached the cabinet to the wall very firmly. Removing that was another major work!!
I eventually managed to get it out.
The kitchen seem so big now.
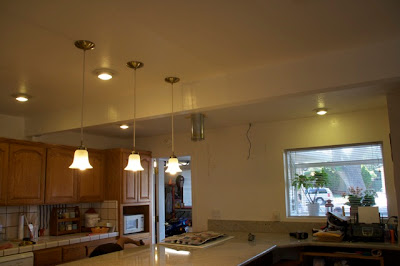
I ended using whole day Saturday on removing this. When I finished all the work, it was getting dark outside.
The next day was hopefully to be the last day to work on this kitchen renovation project.
On top of it, I only had this Saturday and Sunday to work on this. I'd better finished this in 2 days or else I was going to be really screwed.
If you compare this existing cabinet to my size, you can see how big it was. I thought it out before I got started, and I created a stand with 2 x 4 studs to be place right under neath of the cabinet, This way, even if anything happens, I know I am going to be safe and would protect the burners.
I started off with removing all the cabinet doors.
I removed the range hood, all the doors, ethernet cable and TV cable that were coming to this cabinet.
Then I removed the chimney and lastly, I started removing the screws that were attaching this cabinet to the wall and the ceiling.
But....
This cabinet did not come off!!
Eventually, I discovered that on top of all the screws, there are structaul support between the cabinet and the wall, which really attached the cabinet to the wall very firmly. Removing that was another major work!!
I eventually managed to get it out.
The kitchen seem so big now.
I ended using whole day Saturday on removing this. When I finished all the work, it was getting dark outside.
The next day was hopefully to be the last day to work on this kitchen renovation project.
Aug 24, 2008
Emergency Ass wipe
Have you guys been in a situation where you really got to take #2, and ran to the restroom, do your thing, then find out that there is no toilet paper.
I guess you could sacrifice your $20 bill and wipe your ass with it, or hope that your ass is dry and you don't need to wipe your ass, and just pull up your underwear.
Well, over 20 years ago, my father told me how to wipe your ass with very small piece of paper. Never actually tried it, but this is how it works.
Have fun and good luck to you if you ever have to do this for real.
Aug 23, 2008
Kitchen Renovation Project: Buying Island range hood
I spent quite a bit of time in picking the right range hood for my island kitchen.
The first consideration was the size. I did not know but there are generally 2 sizes to range hood, either 30' or 36". The one which was currently installed was 36", so I decided to go with 36".
The next thing was the design. There aren't whole a lot to choose from. Basically, there were 2 types to choose from. One was entirely made out of stainless steal. The other type had hood made with glass and the chimney part was made with stainless steal.
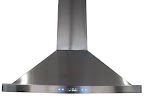
Price. It was all over the map. Some are in mid 400's and some are over $2000. I did really extensive research on this and ended up picking up this one. It was sold for $750.

I placed the order. I was expecting to take at least a week to get to me, but in 2 days, it was delivered to my house!
So I decided to get to the "real" work on 8/16. This is the last weekend before the kids get back to school and things get very busy again. Got to finish this on the weekend.
The first consideration was the size. I did not know but there are generally 2 sizes to range hood, either 30' or 36". The one which was currently installed was 36", so I decided to go with 36".
The next thing was the design. There aren't whole a lot to choose from. Basically, there were 2 types to choose from. One was entirely made out of stainless steal. The other type had hood made with glass and the chimney part was made with stainless steal.
Price. It was all over the map. Some are in mid 400's and some are over $2000. I did really extensive research on this and ended up picking up this one. It was sold for $750.
I placed the order. I was expecting to take at least a week to get to me, but in 2 days, it was delivered to my house!
So I decided to get to the "real" work on 8/16. This is the last weekend before the kids get back to school and things get very busy again. Got to finish this on the weekend.
Aug 22, 2008
Kitchen Renovation: Installing Ethernet
Before I was able to begin remodeling my kitchen, I first had to relocate my wireless access point. Why? Because the wireless access pointed was sitting right on the top of kitchen cabinet that I was looking at removing. The wireless AP was where the red circle is in the below picture.

I decided to take this as an opportunity and reroute my Ethernet cable to go to other cabinet.

So I got into the attic. The Attic was bigger and wider than I had expected and easy to work at. It was more difficult to identify the exact location of the kitchen cabinet that I was planning on installing the wireless AP. I took very precise measurement of the location in my kitchen area and mapped it over to the attic and nailed the location.
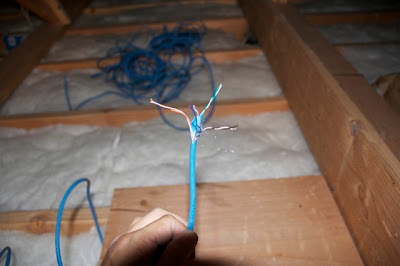
Another pain was to put cat5 connector to this cat5 cable. There are 8 different cables within the cable.
Then this Ethernet cable come out to the small cabinet above the refrigerator. There are 2 cabinets and one on the left is where it is at.

I got the power from the power plug for the refrigerator.

Now the wireless access point and all the cables that goes to it are all hidden and the space look bit more cleaner without any visible cables.
Now it is time to select a range hood that I would like to install.
I decided to take this as an opportunity and reroute my Ethernet cable to go to other cabinet.
So I got into the attic. The Attic was bigger and wider than I had expected and easy to work at. It was more difficult to identify the exact location of the kitchen cabinet that I was planning on installing the wireless AP. I took very precise measurement of the location in my kitchen area and mapped it over to the attic and nailed the location.
Another pain was to put cat5 connector to this cat5 cable. There are 8 different cables within the cable.
Then this Ethernet cable come out to the small cabinet above the refrigerator. There are 2 cabinets and one on the left is where it is at.
I got the power from the power plug for the refrigerator.
Now the wireless access point and all the cables that goes to it are all hidden and the space look bit more cleaner without any visible cables.
Now it is time to select a range hood that I would like to install.
Aug 20, 2008
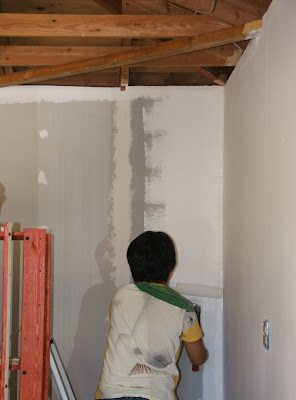
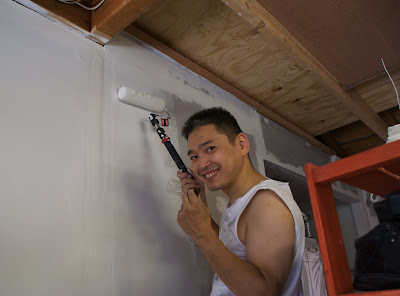
Painting garage walls

Now that I am done with applying compound, I have moved onto painting my garage walls. The color that I applied is called "Swiss Coffee" .... it is just a white paint with slight bit of yellow mixed.
I used 2 paint rollers and 1 sponge brush.

My wife helped me out big time and it went FAST.
Munching on a piece of browny while painting.
This is before drywall was applied:

This is with painted drywall:

The next place to work on is the garage floor. Not sure what I am going to do yet.
Aug 19, 2008
Kitchen Renovation Project
Since I bought my current house, I've been wanting to install island style range hood. I got an island kitchen and I think it would make my kitchen look like ones you see on the food channels or something.
I took this picture a few days after I moved into this house. The the cabinet right above the kitchen counter has the range hood built-in. but I just did not like the way this cabinet looked. It looked heavy and blocked the sunlight from the window to the kitchen, making the kitchen look dark and dull. I've been wondering if I can convert this to something like below:

So I kicked off my kitchen renovation project and just completed it. I will be posting some details of this project
8/10/2008 Ethernet cable installation
8/13/2008 Buying the island range hood
8/16/2008 Removing the range hood and the cabinet
8/17/2008 Installing new range hood
Stay tuned!
Here is my current kitchen looks like:
I took this picture a few days after I moved into this house. The the cabinet right above the kitchen counter has the range hood built-in. but I just did not like the way this cabinet looked. It looked heavy and blocked the sunlight from the window to the kitchen, making the kitchen look dark and dull. I've been wondering if I can convert this to something like below:
So I kicked off my kitchen renovation project and just completed it. I will be posting some details of this project
8/10/2008 Ethernet cable installation
8/13/2008 Buying the island range hood
8/16/2008 Removing the range hood and the cabinet
8/17/2008 Installing new range hood
Stay tuned!
Jul 27, 2008
M-Audio Studiophile AV 40 Powered Speakers

I just did not like the audio quality from my iMac 24" built-in speakers, so I got this pair and I am loving it.
I am not much of an audio person, so I don't know whether the sound quality of this speaker is good or great. But compared with what I have and what I know of, I think this pair of speakers rocks for its price. I highly recommend this pair of speakers for those who are looking at improving their computer audio quality without spending too much money.
Jul 26, 2008
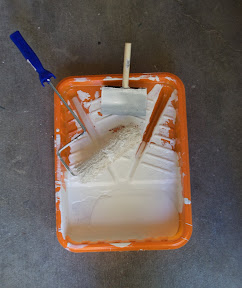
now that I am done with putting drywall in my garage, I've worked on applying joint compound today.
All I got to do is to cover up the joints and screw holes with the compound.
I've read in some place that mixing the compounding just right can be quite tricky, so I bought pre-mixed compound.
I worked on it last Sunday and today (the following Saturday) and got it done. My wife helped big time. If she didn't help, there was no way I could have finished this today.
Here are some pictures.
Before applying compound:
After applying compound:

Before applying compound:
After applying compound:

All I got to do is to cover up the joints and screw holes with the compound.
I've read in some place that mixing the compounding just right can be quite tricky, so I bought pre-mixed compound.
I worked on it last Sunday and today (the following Saturday) and got it done. My wife helped big time. If she didn't help, there was no way I could have finished this today.
Here are some pictures.
Before applying compound:
After applying compound:
Before applying compound:
After applying compound:
It seem little messier but the wall joint should now be all covered up and not noticeable. Will see how it goes when I am done with painting.
If you want to try doing this yourself, I highly recommend that you get putty knives in different width. Don't be so cheap. Least get fairly narrow one to work on details and get wide one to get flat, even surface. Also get in-corner and out-corner putty knives. You can get the very clean, sharp corners with those knives.
I will work on the painting next. Will see how it goes.
Jul 23, 2008
Nerf N-Strike Maverick

I modified this Nerf N-Strike Maverick and posted on youtube. This gun is not all that easy to disassemble, but not too difficult at all. You can get this pretty much anywhere, this is fun to play even as is. I highly recommend this toy gun for all boys in any age.
I did 3 different mods on this.
The 1st mod is the paint. I left silver pieces as is and painted everything else to be either dark green or gun metallic. I used Tamiya spray paint. Tamiya has very wide selection of colors, but their paint stink quite a bit.

The 2nd modification is is to make the cylinder pop out modification. This allows you to load the gun faster.
Before the mod: This comes out just far enough to load 1 bullet at a time.

After the mod: Now the cylinder pops out all the way.

The 3rd mod is the removal of the air restrictors, but I don't have any photos of it.
Here is my Youtube video:
Jul 22, 2008
Nerf Recon CS-6 Camouflage Paint
I posted a video on how to do a Camouflage paint on Nerf Recon CS-6. This came out to be pretty cool.
This is how the gun look like before painting it.

and this is how I did it. Enjoy!
This is how the gun look like before painting it.
and this is how I did it. Enjoy!
Jul 20, 2008
Swiss-Tech Utility Knife
I've been carrying Victorinix swiss army knife on my keychain for the last 20 years or so. but I've lost one recently, so I replaced it with this Swiss-Tech Utility Knife.
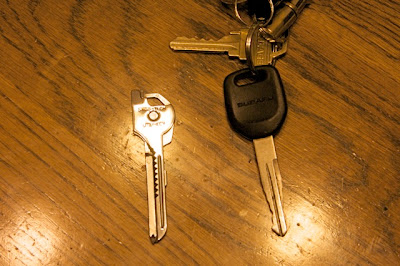
It is really about the size of your car key and once you hang it on your keychain, you'd forget that you are carrying a utility tool in your pocket.
This is how the key looks like when you split it open to use it.


It got a knife blade, flathead driver, precision driver with Philip and flathead, and a bottle opener. It was more useful than I had expected. A thing I liked most about it is that you don't feel that are carrying a utility tool at all.
What I did not like was that the lack of scissors. I was so used to a swiss army with scissors that it simply missed it.
I'd recommend this to anyone who likes new cool stuff and who does not care for a pair of small scissors on your utility knife.
It is really about the size of your car key and once you hang it on your keychain, you'd forget that you are carrying a utility tool in your pocket.
This is how the key looks like when you split it open to use it.
It got a knife blade, flathead driver, precision driver with Philip and flathead, and a bottle opener. It was more useful than I had expected. A thing I liked most about it is that you don't feel that are carrying a utility tool at all.
What I did not like was that the lack of scissors. I was so used to a swiss army with scissors that it simply missed it.
I'd recommend this to anyone who likes new cool stuff and who does not care for a pair of small scissors on your utility knife.
Jul 17, 2008
Self made Attic (Loft?)
After I made the red racks, I've realized that I needed more storage space. So I created a loft in my garage by myself.
My long term goal is not to create just a clean, organized garage, but create a "comfortable space that would make me want to sit, relax, have some coffee and music ."
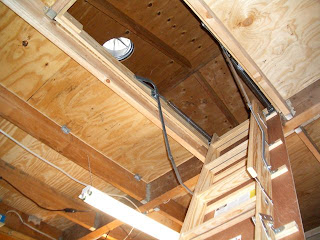
This is how it looks like now. When the ladder is up, it is kinda like this.

and when you get the ladder down, it looks like this.
I got more stuff stored up there now, and that means I got some extra space in my garage now.
This is the picture of the garage before I got the loft space.

This is how it looks like now.

Can you see the difference?
My long term goal is not to create just a clean, organized garage, but create a "comfortable space that would make me want to sit, relax, have some coffee and music ."
Only the extra storage space I could find was the space directly above my head, and so here is what I did.
This is how it looked like.


So I got some 2x 8's installed extra beams. Then I got some plywood and nailed them onto the beams.

As of 3 weeks ago, in mid-June-ish, I finished installing all the plywood except for the space where I was going to install an attic ladder.


So I got the attic ladder, took it home and it is....
HUGE!!

There was no way I was going to get it up there myself, so I got help from my colleague at work and carried it up to my attic. Installation of the attic ladder was very straight forward. I've created temporary support for the ladder with some extra 2 x 4's and nailed to the beams.
This is how it looks like now. When the ladder is up, it is kinda like this.

and when you get the ladder down, it looks like this.

I got more stuff stored up there now, and that means I got some extra space in my garage now.
This is the picture of the garage before I got the loft space.
This is how it looks like now.

Can you see the difference?
Subscribe to:
Posts (Atom)